Your cart is empty
Discover our products
Guide & Video
Window Film Installation Guide
Learn in a few steps how to professionally install your window film without bubbles. With video guide and practical tips.
6
Steps
~30
Minutes
DIY-friendly
More Guides
Installation Instructions for Adhesive Films
Apply adhesive films bubble-free to kitchen fronts, cabinets and furniture.
8 Steps · ~45 MinRemoval Instructions for Window Films
Remove window films safely without leaving any residue.
3 Steps · ~15 MinCare Tips for Window Films
Keep your window films beautiful and functional for years.
General Notes
- Windows and other glass surfaces must always be fully covered with sun protection or mirror films. Partial coverage leads to thermal stress in the glass and can result in glass breakage.
- Only our matte white frosted film can also be partially applied to glass surfaces.
- When installing a film for exterior application, the outside temperature should not be below 5°C.
Installation Guide – Step by Step
1
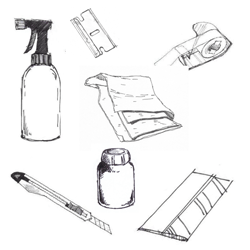
Required Tools
- Adhesive tape (Scotch tape) for removing the protective layer
- Glass cleaner
- Application fluid (included free of charge)
- Squeegee (included free of charge)
- Cutter knife (included free of charge) – cutting at the window is not necessary for custom-cut films
- Glass scraper blade (included free of charge) – CAUTION: SHARP BLADE!
- Paper towels or a clean lint-free cloth
- Spray bottle or empty glass cleaner bottle for the diluted application fluid
Mixing ratio:
30 ml application fluid (≙ one bottle) per 3 l water or 10 ml application fluid per 1 l water (for smaller spray bottles).

2
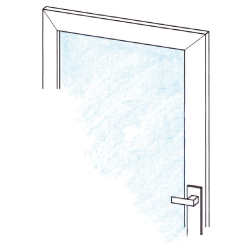
Preparing the Glass Surface
Clean the window pane thoroughly and residue-free with a standard glass cleaner.
Then use a glass scraper on the still wet glass surface, as it can remove even the smallest particles such as dust. No dirt residue should remain on the window pane.
Caution: Glass scrapers have very sharp blades that are secured with a paper strip for shipping. To avoid injury, the paper strip should only be carefully removed from the blade. Please handle the glass scraper with care and never let it, the cutter knife or the application fluid get into the hands of children.
3
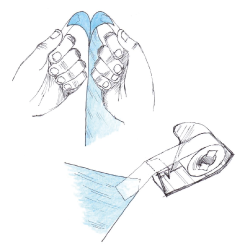
Preparing the Window Film
All window films are provided with a transparent protective film. The easiest way to remove it is with the help of two adhesive strips (Scotch tape).
Stick the tape on the front and back of a film corner. For small film cuts, simply pull both sides apart.
For larger films, you will need a helper. Hold the film with the tape on the front side while your helper pulls off the protective film with the tape on the back side.
Important: Sticking together of the film as well as unsightly creases and folds can be prevented by continuously spraying the adhesive side with application fluid while removing the transparent protective layer!

4
Installing the Window Film
- First spray the film and then the clean and dry window pane with the prepared application fluid mixture.
- Place the film centrally on the window pane. If the film does not slide well, there is too little application fluid on the window pane. Spray more!
- Also spray the back of the film to make working with the squeegee easier.
- Now press the application fluid evenly from the center to the right and left with the squeegee towards the rubber seal until there is no more residual liquid under the film.
- Carefully dab the edges and the back of the film with a soft cloth. If necessary, press the edges again carefully with the squeegee.

5
Edge Sealing for Exterior Sun Protection Films
If you have installed a reflective exterior film, you must seal the film edges from the outside with vinegar-free (neutral-curing) silicone after drying.
6
Cleaning the Window Film Surface
Let the film dry for 3 days without touching it.
Wait a few weeks before the first cleaning of the installed film.
Please never use hard or sharp-edged tools (e.g. brushes or blades) or microfiber cloths to clean your window film surfaces. A normal paper towel or cotton cloth is sufficient for proper cleaning.
You can clean your window films with standard household glass cleaners. It is only important that no acidic ingredients are contained in the cleaning agent that could attack the films.